

|
Started |
: |
September 20th, 2005 |
|
Finished |
: |
October 15th, 2005 |
|
Base |
: |
|
|
Parts |
: |
MOTU 2002 |
|
Materials |
: |
Fimo, Fimo liquid, |
|
Points of |
: |
~25 |


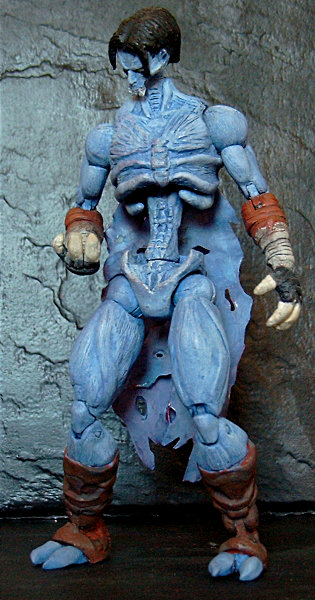
Character & Intent
Yup, another Raziel. I have to admit that I just
couldn't resist the idea of using a Marvel Legends
Nightcrawler when I saw it pop up at Fwoosh.
So I stole the idea.
Like a popstar.
I would love to give credit, but as hard as I try,
I can't find the topic anymore. So maybe I saw
it somewhere else. Or dreamed it. Which would
be spoooooooooooky.
~Update
!
~
Update
!~
The mystery inspiration has been found - it's
the fwoosh's own FuzzyBlueDemon
- But at the
munich circus, he's known as the incredible
Nightcrawler. Thank you, you filthy mutie !
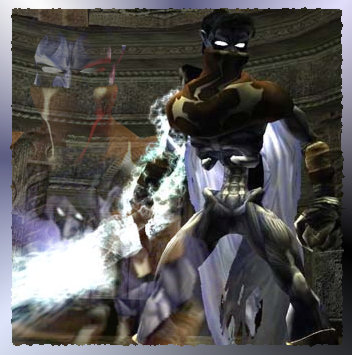
Of course I already had a Wraith Raziel figure,
so I decided to base this figure specifically on
the design tweaks shown in Legacy of Kain:
Defiance. I'm not sure if I suceeded at that.
The proportions need work, and he could
use some accessories.. But all in all, I'm
satisfied.
Creation
I knew right from the start that this custom would require
some techniques that I'd never applied before, so planning
started even before I held the base figure in my hands.
You'll learn about those techniques further below.
(Suspense !)
The first step of the actual work process, however,
was the de-assembly of the worlds only (plagiatism
nonewithstanding) swashbuckling fuzzy blue elf.
At this point, I'd like to point out that I did pose
the figure a bit before that and ended up breaking
the tail at the first attempt to pose it. If I had bought
the figure for what it was, I would've been pissed.
No, really. I've hired a big guy named Roscoe to
urinate all over me when I clumsily wreck my figures.
Maybe I said too much.
One thing that worked to my advantage was the way
that Kurt's upper torso area was put together. I was
expecting to have to dremel away the shoulder extensions,
but it turned out that this part of his costume is made
out of glued-on, softer material which was easy to
remove using the usual boiling method.
Once again, I chose to work on the parts seperately
for reasons of convience. The first thing I did was to
sculpt the arm bandages. Or are those wraps ? Why the
hell would a powerful vampire wear that stuff, anyway ?
I digress again.
I realized quickly that the original stomach torso joints
could never be modified to fit Raziel's physical condition,
so I had to find alternate means of re-building that area.
What I finally settled with (after dremeling the hip into
a vaguely bony shape) was a nail which I bent and locked
into place with glue and plumber's epoxy. Then I glued the
kayo knee joint on top of it and sculpted a rough
version of the stomach area, around it all, encasing the
joint in the process. I also thickened the top half of
the knee joint to fit the Nightcrawler chest shell.
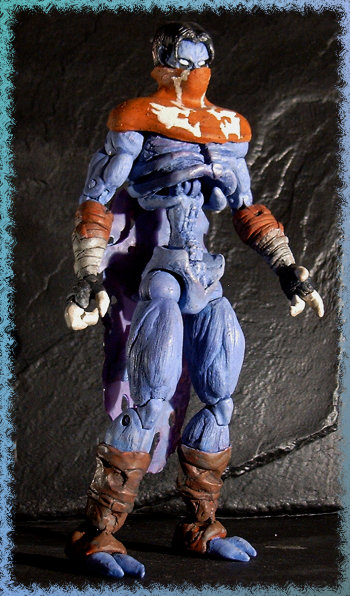
The legs needed extensive sculpting to match Raziel's exposed,
but slightly stylized musculature. Probably one of the more
intricate sculpts I've ever attempet. In fact, I did rip away a
"finished" leg sculpt, as it wasn't quite right yet. The final
result isn't quite thin enough, but I do know my limits
and those of the materials I work with. Most of the lateral
muscle
structure's texture was created using a combination of sculpting
tools and a hard brush. Once again, the shin guards prove to
be especially challenging, and I don't think that I lived up
to
that challenge entirely .
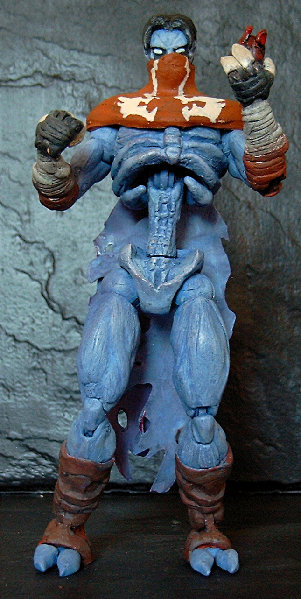
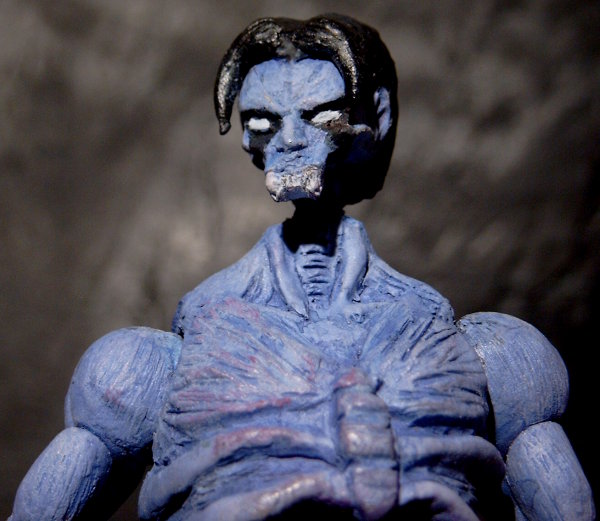
A step that took place simultaneously was the head-sculpting.
Originally, I planned to use Nightcrawler's original head,
but
upon closer inspection, I realized that it just doesn't look
close
enough to Raziel. Or to Nightcrawler for that matter. What
Toybiz gave us here actually looks much more like Lorne
of the "Angel" franchise.
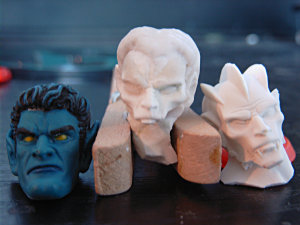
So I looked around in my collection a bit and fortunately,
I found a surprisingly good match in Skeletor's post-naptally
cojoined henchmen Two-Bad, or more precisely, his blue
"Tuvar" side. So I made a ceramic cast of it and
started
my modifications. It's very comfortable to use this
material, as can easily be carved with a knife and
smoothened out with a wet q-tip. Sculpting over it is
unproblematic, as well. That came in handy, as
obviously, I had to do some heavy modifications.
But don't take my word for it, see for yourself:
|
|
|
Left to right: |
The finished headsculpt was then casted once again
in synthetic resin and augmented with a cast of skeletor's
teeth. Horrible miniature work. Far too intricate for me,
as the finished pictures further above show.
Speaking of the head, that's where one of the aforementioned
new techniques finally came in. I didn't want to sacrifice the
luxury of a ball-jointed neck, but I knew that
I wouldn't
be able to make it work with the parts that I had.
So what I did was to insert a strong magnet into the
head and attach a small metal ball to the neck. A metal
ball which I got from the tip of the hook of a clothes
hanger, but a metal ball, nonetheless. I found that
this technique works surprisingly good as long
as one makes sure that the immersion in the head
is wide enough to allow for a full range of movement.
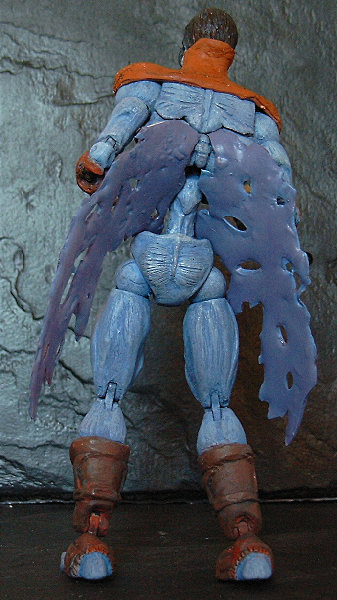
With the figure more or less fully assembled (there's
no better than Pattex Blitz Plastik glue to put a
figure shell bag together), I commenced the sculpting
of the upper body, which took a lot of time and
referencing to get right. The rubber plate armor
thing came in handy once again here: I could not
attach the wings before the paintjob including
primer and finish were done, as soft material
doesn't take to that well. Yet, the sculpt of
the bag had to go over the wings. So what
I did was to make use of the indention in
the back. I applied a lot of talkum powder to
it, so that the Fimo I used for sculpting wouldn't
stick. This way, I could do the paintjob on this
piece of the back seperately and glue it on with
the wings in place later.
As for the wings themselves; I searched for quite
a while to find the right materials. I think that
I have
found a passable solution in Fimo liquid, which I
brought into a fitting shape by pouring it over a cut-
out of the wings. I also found out that re-heating the
material with wet paint applied somehow fuses the
paint to it, which is something I'd always craved in
customizing. And of course, the same week I found
that out, my usual store stopping selling it. Hooray.
The paintjob bears not much that would be worth mentioning.
As before, I tried to match the in-game texture, which is
somewhat
pale with a violet tint to it. I think that I did a much
better job than
with my previous custom here.
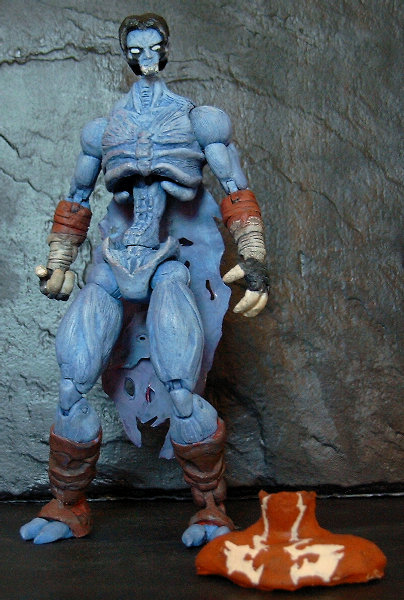
And finally, there was Raziel's trademark capescarfthingy.
I knew that it would be an integral factor for this figure,
as it is an important part of this wraith's design. I also
knew
that I wouldn't use cloth again, as it was a (nerve-)wreck
the last time around. And finally, I knew that I wanted
it
to be removable. And this lead to the second technique
I developed beforehand.
What I decided to do was as follows:
The first step was to take a latex mold of the finished upper
body sculpt. Using that, I made a ceramic cast. Onto this
cast, I sculpted the capescarfthingy using Efa Plast
- once again with a close look at reference material.
The Efa Plast was important as it is a water-based
sculpting compound with a naturally slightly rough
surface, which comes close enough to cloth in
appearance. Also, it was important that it wouldn't
adher to Fimo, as the next step was to make a two-part
mold of the sculpt using the latter.
Finally, I carefully filled that mold with thin layers of
liquid latex which I had mixed with the appropriate
hue of brown citadel paint. After this hair-pullingly
slow process, I carefully removed the product of it
from it's shell and finished it by cutting away the
excess borders and adding some details (like the
clan symbol) with paint-enriched latex in varying
states of dilution.
And that was it - The Reaver of Souls, the
prophesized one, the one, the only, the blue
Raziel !

(To main)