|
Started |
: |
~ Unrecorded ~ |
|
Finished |
: |
~ Unrecorded ~ |
|
Base |
: |
Robin |
|
Parts |
: |
~ none ~ |
|
Materials |
: |
"efa plast" modelling clay, |

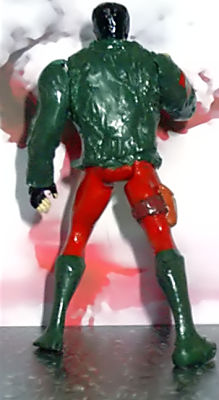
Character & Intent
This is the second of my Amalgam designs.
Hitpool is the combination of two killers
with a twist: Hitman & Deadpool. And
it is my third custom figure.
It took a really long time to complete
this work and I'm still looking for a
fitting gun to complete it's appearance.
Some would surely consider this
one a failure or even a waste of
time, but I see it as the result
of a lot of work and a great
learning experience.
In addition, it was a great feeling
to erase one of those gawd-awful
Batman Movie designs from the
face of earth.
Creation
I startet this one out by sanding
the odd mask off of the face. For a
lack of better tools, I used actual sanding
paper which naturally took a good amount
of time. The mask was replaced by Play Doh
Sunglasses that were shaped from a mold I had
taken from another figure (forgot which one).
Another product of Play Doh was the new shape
of the hair, as the original cut was way to short and
flat.
Some more simple additions were the belt buckle
and the leg-bound utility strap. While the belt buckle
and the big bag to the side were made from Das Pronto,
The actual strap was made from Fimo sculpy. The pro-
blem with that was that this is actually an ofen-hardening
material. I tryed to solve this by pressing a broken glue
gun onto the strap. The results weren't all that great.
The logo on the belt buckle was printout that was
glued in place and covered with clear laque.
The necktie was intially a simple piece of plastic
foil that was glued to the face and finished with
several layers of paint.
And than there's the jacket.
I made the mistake of basing the jacket on some ripped
hygiene glove. It took me more than an entire night to
glue the damn stuff into position and it still didn't look like
I had imagined it to do.
It was followed up by a layer of Efa Plust sculpting clay.
And then some Play Doh clay. And some Fimo which had
to be fixed with the glue gun again. Then some Das Pronto.
And so on and so on and so on.
It took me weeks to before I put the final layer of paint
on which was also caused by the material apparently
not allowing the paint to dry very well.
So, after I had added some more clay to the feet
to improve the stand and had ensured that the paint
was dry, I was very revlieved to be able to finally
put this damn thing onto my shelf.
Now if only I could find a fraggin' gun....